Thank you!!!!!
Tuesday, March 22, 2016
Votes wanted!
Craftsy is running a new contest...."Make It Madness" Knitting Tournament. My pattern "Lacey Arches Infinity Scarf" is one of the top 16 most popular patterns on Craftsy. It needs your votes in order to make it to the second round. With your vote you have a chance at winning a free Craftsy class. The contest can be found on the Craftsy blog. Round 1 voting ends on the 24th. Please vote! And get your friends, family, neighbors, acquaintances, and anyone else you know to go online and vote for my pattern (Made For Ewe).
Thursday, March 17, 2016
Still here.....
........life has kept me busy. I can't believe it's been 3 months since my last post. Between guild meetings, board meetings, classes, workshops, and quilting bees I've barely had time to catch my breath. I won't even mention quilt shows and retreats. Whew!!


What's new? Lots! I've opened up my etsy shop again. You can find my patterns here....as well as on Ravelry and craftsy. Working on a couple of new designs. I've also got a Facebook page. Two to be exact . One for me and one for my patterns. Etsy and Facebook are both still works in progress but I hope to have both complete soon.
Been busy working on a scrap quilt. I'm piecing it on my featherweight. My Bernina is busy with machine quilting. It's been nice working with the featherweight. Back to basics. Gotta love it. :-)
My hubby surprised me with a new floor hoop yesterday. I love it and can't wait to use it.
Got new babies. These have feathers instead of wool. Chickens! I'm raising a dozen Buff Orpington pullets ( and maybe a rooster if I'm lucky). Most of them were about a week old and had wing feathers starting to come in. They are in a home-made brooder inside the house. It's just too cold to put them out yet. In the meantime my hubby is revamping the old coops out in the barn for them.
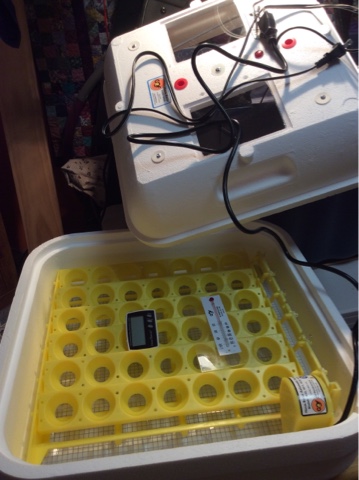
My loving hubby also surprised me with my very own incubator. I'm so excited and can hardly wait to use it. I know it probably doesn't look like much, but it has everything....egg rotator, circulating fan, gauges for temperature and humidity levels, plus two nice sized viewing Windows on top. I'm in the process of obtaining some fertilized eggs ( chicken and duck).
Update on the sheep: all are doing well. Ready for shearing. Now if the weather would cooperate. Looks like I may have two ewes expecting sometime next month. I didn't get to leave them in with Damascus as long as I would have liked to so wasn't really sure if anything had even happened....with him being a first-timer and all. Only time will tell.
Saturday, January 9, 2016
Fun With Vinyl


The glasses were her idea. Marbles or some other pretty stones are put in the glass that says "pounds to go". One marble for every pound you would like to lose. For each pound list a marble goes into the other glass ("pounds lost"). It's a tangible way to see progress and stay motivated even when you can't physically see the difference. Sometimes that's the hardest part...staying motivated.
As for the "liquid therapy" glass.....well, like I told my SIL, that's for those difficult days. :-)
All the vinyl was cut on my silhouette cameo. What fun!!! I love learning new things on it.
Thursday, December 31, 2015
Happy New Year!
It's time to shed the old and welcome in the new.....just like the trees are shedding their heavy coats of snow.

This is the time when many are busy making resolutions or picking their word for the year. I'm not one for making resolutions. Invariably I end up forgetting about them and then feeling bad because I did. I prefer setting small monthly goals. Things that are easily attainable....like completing a ufo or continuing with my daily exercise routine. Things change. Life happens. I prefer to keep things simple and enjoy each day as it comes. :-)
Wishing everyone a very happy new year. May it be filled with lots of love, laughter, joy, and quality stitching ( or spinning/knitting) time. :-)
Monday, December 28, 2015
Final project...
.....for the year. While it may be small it makes a BIG statement.....especially now.


And these photos were taken before an additional 3-5" fell overnight.
Friday, December 25, 2015

Wednesday, December 2, 2015
Keeping Busy
One holiday is done and another on the horizon. This always seems like such a busy time of the year for me. There's gifts to be made. (Which I've already made a dent in my holiday to-do list.) I have had the opportunity to enjoy a bit of "recreational knitting"....which was a treat in itself. I've been taking a class by Cat Bordhi on Moebius knitting. So far I've knitted two Moebius cowls and a Moebius bowl.
This first Moebius is knit from a commercial yarn.....a bulky weight baby alpaca. So soft!!


This lace Moebius is knit from a handspun yarn. The green is a two-ply bulky weight core spun suri alpaca. The white is a softly spun two ply suri/Shetland blend. This went home with my oldest when she was out for Thanksgiving. It's a nice large Moebius.....one that can be pulled over the head if needed. Has a nice weight to it.
My Moebius bowl is knit from handspun Finn. I dyed it after it was felted. The dye split giving it a nice coloring on the bottom.
In addition to enjoying my moebius class, I published a new infinity scarf pattern. This one is called "Frosted". It's knit from a handspun super wash wool blend. This also went home with the oldest. After being without power for over a week due to the fierce windstorm that devastated the area, she wanted to be sure she had plenty of warm things to wrap up in. Doesn't hurt that we also had a white thanksgiving....and that it is snowing as I type this. The pattern for this infinity scarf can be found on Craftsy as well as Ravelry.
Back to the holiday gift making list.
Subscribe to:
Posts (Atom)